
Originally, my best friend and I planned to hike the entire John Muir Trail (JMT) over 4 weeks, starting in late August 2015 (known as a “thru hike”). Due to an injury and schedule conflicts, we realized that we would have to break the hike into a handful of trips. Regardless, we spent a considerable amount of time planning for this adventure and I thought it would be helpful to share with others planning for the same epic hike! Note: I am not a super rugged camper. I can camp and hike with the best of them, but I do like to have a few small comforts along the way. Basically, these recommendations apply to the average hiker (I couldn’t do ultra light).
First off, you will need a permit to hike most of the JMT and they definitely check. A ranger asked my brother and I for our on the last day of my second JMT excursion. Play by the rules, or else risk a hefty fine. When we had to cut our trip shorter, we discussed with the ranger while picking up our permit and they were able to amend the days on the spot. So basically, request a permit for the maximum amount of time you plan to spend hiking the JMT, and you can always whittle it down later.
Step 1: Request a permit. This is the PERMIT WEBSITE. You can begin requesting them exactly 24 weeks (168 days) before your requested start/entry date. Be on the ball with this as the permits are in high demand and will likely be gone for your day if you don’t submit exactly 168 in advance. You have to fax in the form or get someone on phone. I ended up using a free online fax program (Nextiva or eFax) to send my request once every morning (I sent at 8am every morning). It took me about a week of trying every day in order to get a successful permit. So plan on building a buffer around your start date, for personal planning. Only one person from your party should apply each day.
You will also need to know your start and end trailheads. Our preferred trailheads were:
- ENTRY: Happy lsles->Sunrise/Merced Lake Pass Through (meaning we had to hike a very long first day from Happy Isles up past the main camp to the Sunrise area. A longer hike day, but higher probability of getting a permit).
- First night camp: Sunrise Creek
- EXIT: Whitney Portal (this is the exit trailhead for those planning to cover the whole JMT and hike Mount Whitney at the end).
- Exit Yosemite Park via Donohue Pass – YES
- Half Dome permit – NO (we weren’t going to do this side hike as a part of our trip)
We put in a few other entry trailhead options, with corresponding camp sites (in case our first choice wasn’t available).
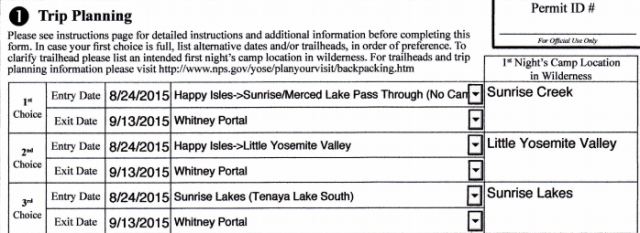
Example JMT Permit (full hike)
Step 2: Planning. Once you receive the glorious confirmation email telling you that your permit has been reserved, now you can start planning the logistics.
- Plan to have someone pick up your permit the day before the hike begins (so that you can get an early start on entry day). We picked ours up at the Tuolumne Meadows Wilderness Center (open daily 8:30 am to 4 pm.) – Tuolumne Meadows Lodge Rd, Yosemite National Park, CA 95321.
- Arrange to drop one car at the exit portal and one at the entry portal and leave them for the entirety of your hike. Another option is public transportation or having a friend pick you up at the exit or drop you at the start.
- Purchase or rent a bear canister. This is required! I got mine here and loved it: BEAR CANISTER. I loved that it is clear so I could see everything inside. Additionally, it’s lighter than most options and the lid doubles as a pan for cooking!
- Get your gear. Below is the gear list I created for our trip (I carried way too much on my first excursion on the JMT…then I leaned the list out based on the experience. You really do not need as much as you think you do! A light pack is key.)
- Full JMT Notes
- Total mileage: 221 miles
- Plan on < 15 miles/day (we averaged about 10 miles/day)
- 20-25 lb max for your pack
- Expect cooler nights (esp at higher elevations)
- Day: 65-70 degrees
- Night: 30-45 degrees
Erin’s Packing List:
- Camping
- Cooking supplies
- Stove (jetboil)
- Stove fuel canisters
- Dish soap (Dr. Bronners or Campsuds)
- Dish sponge
- Spork
- Pot (lid of bear canister?)
- Coffee Mug
- Firestarter/lighter
- Purification Drops (AquaMira) or Steripen
- Bear canister
- Sleeping
- Camp pillow
- Sleeping bag
- Sleeping bag liner
- Tent
- Thermarest
- Thermarest chair converter
- Headlamp + batteries
- Navigation
- Map
- Compass
- Cooking supplies
- Clothes
- Warm coat/Insulating layer – down and/or wool (no ski jacket)
- Fleece jacket (synthetic)
- Rain coat – waterproof shell
- Waterproof pants
- Thin inner socks (polypropylene)
- Thick outer socks (NO COTTON – preferably wool with high density loops)
- Light boots with quality insoles (ArchCrafters)
- Synthetic underwear (3 pair)
- Cotton underwear (for night – 2 pair)
- Long underwear (wool preferred)
- Pants that convert to shorts (1)
- Dryfit tops (2-3)
- Quick-dry sports bra (2)
- Warm pajamas (fleece)
- Comfy socks/slippers for night (1)
- Warm hat & gloves
- Accessories
- First Aid Kit
- Moleskin
- Hand sanitizer
- Large safety pin
- Neosporin
- Wearables
- Hat (that covers back of neck)
- Bandanna
- Small towel (dries quick)
- Sunglasses (polarized)
- Watch
- Trekking Poles
- Toilet Paper
- Extra ziplocks
- Garbage bag
- Camera
- Duct tape
- Water bottles or Camelbak
- Superglue
- Toiletries (nothing scented!)
- Toothbrush + Paste
- Soap
- Shampoo/conditioner
- Chapstick
- Nail clippers
- Medications (Ambien, pain, inhaler, diarrhea)
- Tampons (?)
- Sunscreen
- Bug spray
- Baby Wipes
- Rescue Devices
- Whistle
- Compact mirror
- JMT trail book
- Book to read
- Deck of cards
- First Aid Kit
Step 3: Food List. This will definitely take some planning if you are aiming to hike the entire trail. You will want to ship food supplies packages in advance to you various stops. It’s nice to bring some fresh vegetables and fruit for the first few days. We were also surprised to find that we were less hungry the higher and longer we hiked in elevation. So we definitely overpacked on food, which made our bags super heavy! My favorite foods along the hike were peanut butter packets, string cheese, beef jerkey, dried pineapple and mango, chocolate anything, oatmeal, and instant mashed potatoes. We found that the less intensive the prep/cooking/cleanup was, the more we enjoyed the meal. 🙂 Emergen-C, lemonade and crystal light packets were phenomenal for covering the taste of the purification drops in our water.
Food Packing List Ideas:
- Trader Joes or buy in bulk (~2lb/day)
- Quick cooking grains & flavors
- Couscous
- Quinoa
- oatmeal
- Tuna + mayo packets
- Nuts
- Dried berries
- Trail Mix
- Powdered coconut milk
- Powdered milk
- Curry powder (and other packet seasonings)
- Instant hot chocolate & tea
- Oranges
- Hard candies
- Protein/electrolyte pouches
- Freeze dried food
- Water Flavor (crystal lite)
- String cheese
- Jerky
- Tortillas
- Energy Bars
- Salami and sliced meats
- Granola
- Small candy
- Mac & cheese
- Instant soups
- “Tasty Bite” – Indian food packs
- Fresh veggies (for first few nights)
- Freeze dried meals
- Chocolate
- Emergen-C
- Cheeze its
- Peanut butter
- Sweet potato chips (salty)
- Dehydrated foods
- Instant pancake mix + syrup (spatula?)
- Ramen noodles
- Pop tarts
- Instant mashed potatoes
- Quick cooking grains & flavors
Notes I gathered from various sites that proved very helpful:
- Choose the right foods: Dense, high-calorie options are best: Tortillas instead of bagels; dried fruit instead of oranges.
- Plan every meal: Avoid bringing too much (or too little). Lay out each day, divide portions, and pre-measure mixed foods like rice and pasta.
- Repackage: Get rid of bulky boxes and inflated packaging. Put food and toiletries into resealable bags or small containers. This saves space and reduces garbage. Make sure to keep the instructions and label each item.
- Check that it fits: Before you start your trip make sure ALL your food, trash, toiletries, and scented items will fit inside your canister on the first night.
- Carry the first day’s food outside of the canister: Snacks, lunch, and dinner. Just be sure to keep that food with you at all times.
- Minimize your toiletries: Just like food, pack small and don’t bring more than you need. Put toothpaste, sunscreen, bug repellent, etc. into small reusable containers.
- Use your canister correctly: Establish your kitchen about 50 feet from your sleeping area. Make sure to properly close the lid securely at all times. Leave the canister on the ground in an open flat area away from cliffs or streams.
- All scented items (food, toiletries, and garbage) must fit inside the canister when left unattended.

Step 4: Ship food packages to desired pitstops. Check out each location’s website to determine exact instructions and timeline of when to send. Most plan to send 3-5 days of food.
Resupply Points:
- Address your package to:
- YOUR NAME; c/o General Delivery; Address of the Resupply Point; HOLD UNTIL (date)
- Tuolumne Meadows (22.8 miles)
- Red Meadows Resort/Mammoth Post Office (59.2 miles) – redsmeadow.com
- $35 for mailed packages (pick up btwn 7am and 7pm)
- Red’s Meadow; PO Box 395; Mammoth Lakes, CA 93546
- Vermilion Valley Resort (88 miles) *Difficult to get to; NOT ideal
- Muir Trail Ranch (107.9 miles) – page 25 – muirtrailranch.com
- $65/25lb bucket (5 gallon paint canister drum)
- Has power strip to recharge electronics
- Store carries fuel, batteries
- Lodging available for a fee with reservation
- Muir Trail Ranch; PO Box 176; Lakeshore, CA 93634
- Independence (179.4 miles)
In my research, it seemed the best options for resupply were:
- Tuolumne Meadows (if you have a resupply package here, you can carry very minimal weight for your first few days. This is awesome because you will be gaining a lot of elevation in those days and you will feel every pound!). Tuolumne Meadows is right off the trail, so not much of a detour.
- Red Meadows Resort. Good place to stock up on your next resupply…
- Muir Trail Ranch. Excellent resupply point, basically marking the halfway point on the trail. You can make a reservation to sleep there for a night or two, if desired. You will want to send the largest resupply package here as most try to go from here through the end at Whitney without stopping again. (Independence resupply is considerably off the trail so would cost you some time to get there).
Step 4: HIKE! Our two short hiking adventures on the JMT are outlined below.
JMT – Part 1: August 2015: Happy Isles to Tuolumne Meadows (21 miles) ROUTE
- Day 1 – woke up at the crack of dawn in order to take our time on the continuous ascent. Gorgeous views of Yosemite Valley and Half Dome.
- Camp: Near Sunrise Creek, just past the fire-ravaged forest.

- Camp: Near Sunrise Creek, just past the fire-ravaged forest.
- Day 2 – we had a fitful sleep as a bear tried to eat the stove of our neighbor’s
 campsite! We woke with the sun and made our way to Cathedral Lakes (our second camp site). The meadows outside Tuolumne are stunning. They seem to go on endlessly. We passed Sunrise High Sierra Camp, where we stopped for lunch. We got to Cathedral Lakes fairly early, which gave us a pleasant break. We swam in the frigid water and set up camp. We enjoyed hot chocolate by the water’s edge and played cards. Perfect end to an excellent day.
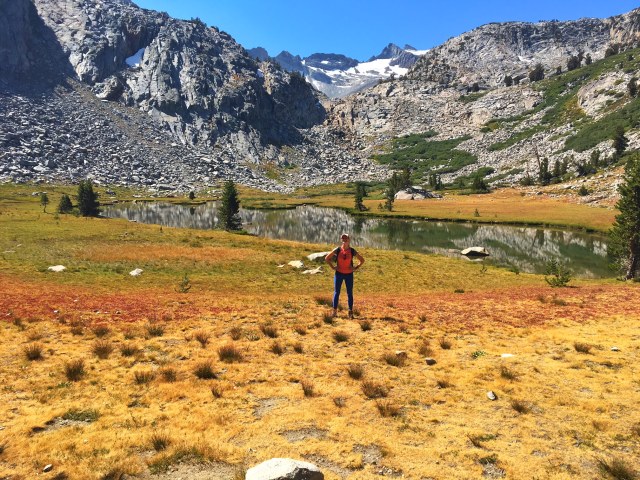
- Camp: Cathedral Lakes (this is a MUST. We could have stared at the mountain reflection all day)

- Camp: Cathedral Lakes (this is a MUST. We could have stared at the mountain reflection all day)
- Day 3 – Due to the stress of the injury, we decided to hike out at Tuolumne Meadows. From there we grabbed the bus back to Happy Isles, where we picked up our entry car. We enjoyed greasy pizza and celebrated with a glass of wine. We then drove to get our second car from our planned exit point (Mammoth – Red’s Meadow).

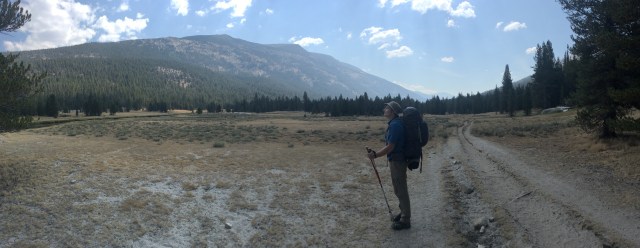
JMT – Part 2: August 2016: Lyell Canyon (Tuolumne Meadows) to Devil’s Postpile (31 miles) ROUTE
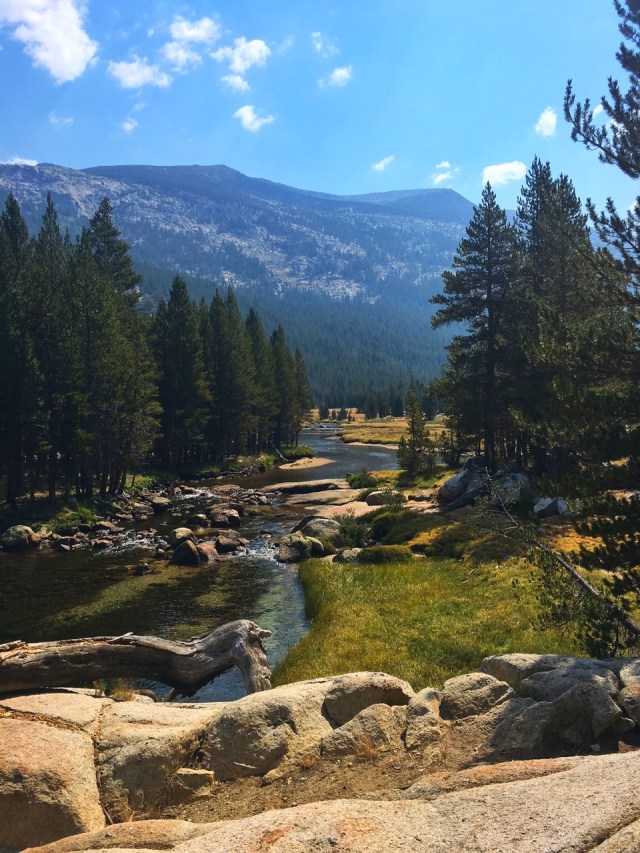
- Day 1 – hike from Tuolumne Meadows to Lyell Canyon. Stunning! Words cannot describe the vast open meadows and the sudden build of the mountains at Donohue Pass. My brother and I opted to camp just before the footbridge that begins the ascent to Donohue Pass. Lovely campsite that felt very secluded and close to a great water source. A few deer even visited our campsite.
- Camp: Lower Lyell (before the footbridge)
Our favorite view in the meadows. Too bad you aren’t allowed to camp here!
- Camp: Lower Lyell (before the footbridge)
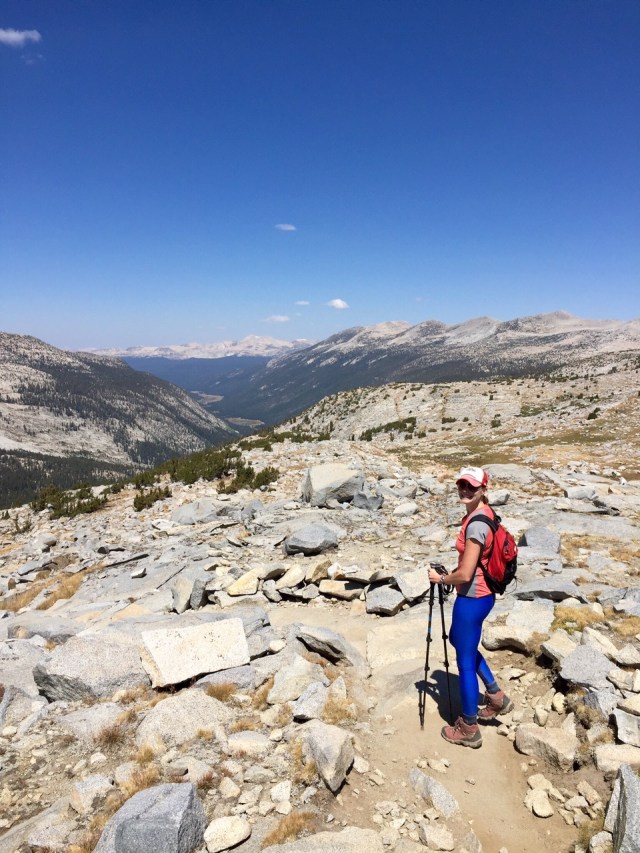
- Day 2 – Our plan was to hike over Donohue Pass and onward to Island Pass, where we would stay the night. Yet, as fate would have it, another conflict required us to shorten the excursion. So we opted to pack up our camp and leave all the gear at our camp site. We then took light daypacks and hiked up to the pass to take in the views. Totally worth it! We practically ran down the mountain back to our campsite. From there, we picked up our packs and hiked back out at Tuolumne. An intense 18-mile day!
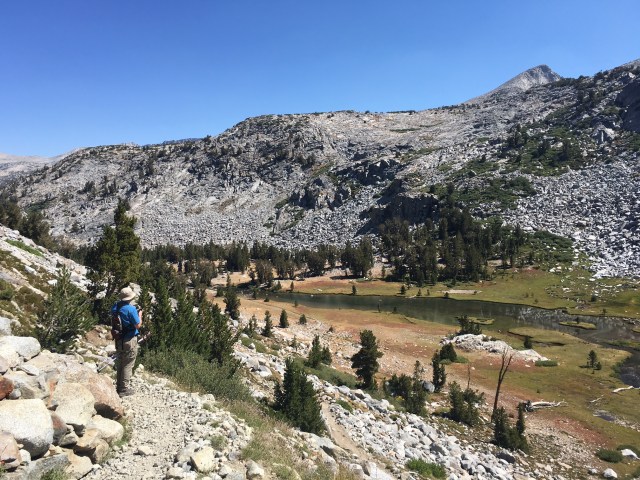
On the ascent to Donohue’s Pass
Upper Lyell…had we known, we might have camped here!
Donohue’s Pass!
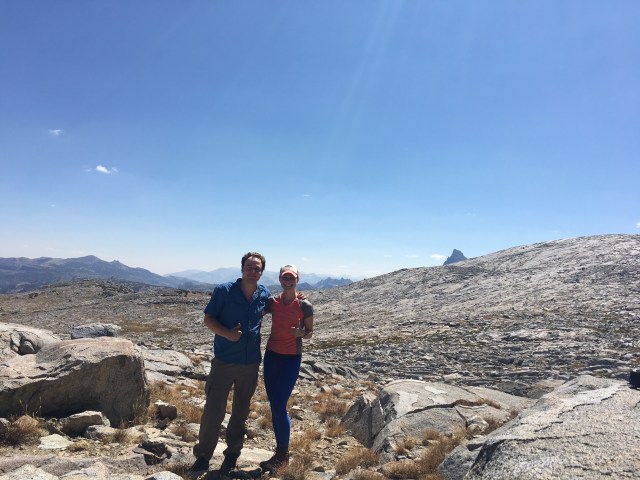
My brother and I…another successful trek!
If you have any questions, please reach out at any time! Happy to provide any insight on camp sites, mileage, packing lists, etc. Bit by bit, I will get through this whole trail. 🙂
“Of all the paths you take in life, make sure a few of them are dirt.” – John Muir
